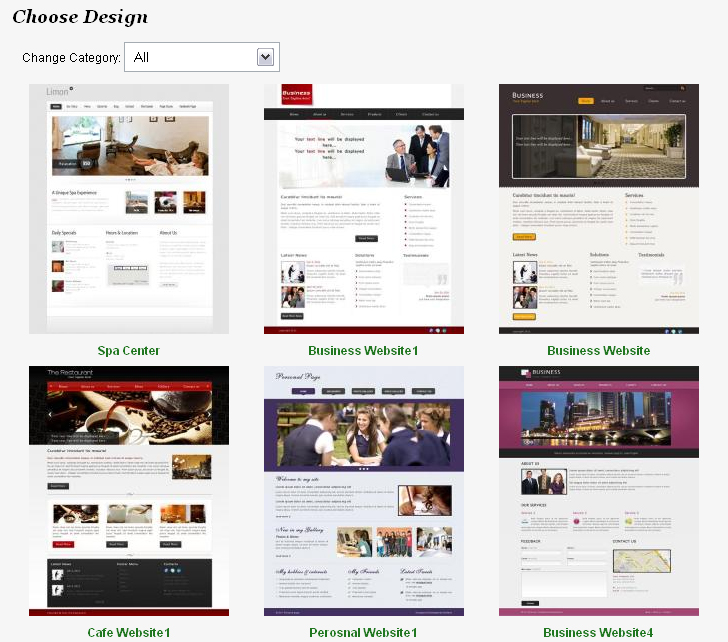
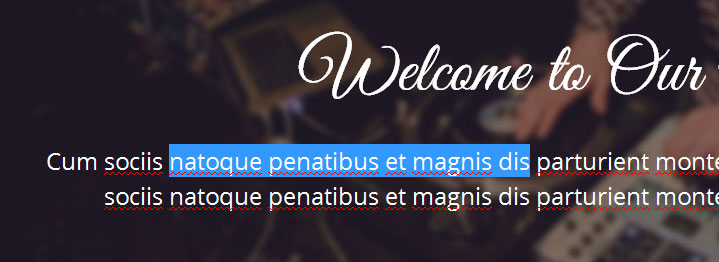
Some of our best website published by our users.
Static live access to the majority of the features on Making You LIVE, unlimited pages, 1 email account, 10 GB bandwidth, 1 GB Web space, Basic design and is ideal for Personal use.
Dynamic live allows you to add Unlimited pages, 25 email accounts, 30 GB bandwidth, 3 GB Web space, Dynamic design plus image slider.
Professional live allows you to add unlimited pages, 50 email accounts, 50 GB bandwidth, 5 GB Web space, HD design plus Customize logo.
Corporate live allows you to add unlimited page, unlimited email accounts, unlimited bandwidth, 10 GB Web space, Custom HD design plus fully customize design.
If you don't see your site online, there's no need to panic. Just use our troubleshooting guide to figure out what's going on and you'll be able to get your site up and running in no time.
First and foremost, make sure you've Published your site using the green Publish button. Still can't figure out, no worries contact our customer support by email, chat or phone.
Second, make sure you're trying to reach your site using the address bar of your web browser. If you use the Google or Bing search bar (which most browsers include these days) then you're not going to find your site until Google or Bing index it, and that can take several weeks after you first Publish the site (this is normal and has little to do with Making You LIVE- if you want to learn more about improving your Search Engine Ranking, go to that section of the help area). The address bar is the wider bar, right at the top of the browser.

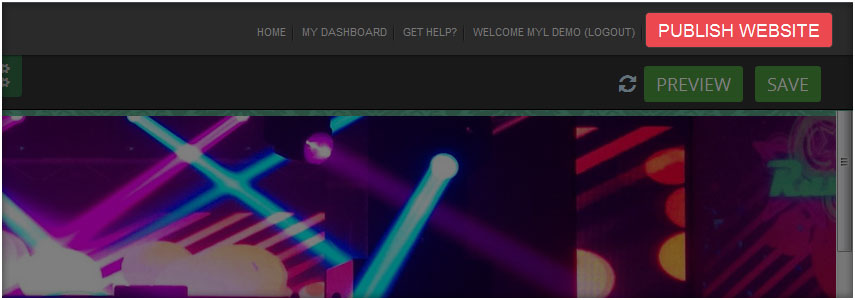
When you're ready, you can get your site out on the internet by Publishing it. You can do this at any point, and you can always add more content to the site later and Publish it again.
To Publish a site, click the green Publish button.
This will bring up a verification box, letting you know your site has been Published.
To edit your site after you first Publish it, just log in through makingyoulive.com (or through the Log In button on the upper right corner of this page), make your changes in the editor and Publish the site again. Any changes you've made to the site will immediately appear on the live site after you press the Publish button.
Note that if you do not see the changes you've made after you Publish the site, it's probably because your browser is displaying an older version of the page from its cache. Just reload the page using your browser's reload button to bring up the newest version of your site.
When a contact form is submitted, the information entered in that form is emailed to the address assigned to the form. But what should you do if you're not receiving the form emails?
First, check your Spam or Junk Mail folders in case the messages are being routed there. If you see the messages in your spam folder, mark them as "Not Spam" using whatever option your email provider gives you. The more of these you mark as "Not Spam" the less likely they'll be to show up in your spam folder.
If you don't see them there, make sure you have the correct address assigned to your form.
Then make sure the email is entered correctly, if it isn't, re-enter it and publish the change to your site. Delivering form emails to the inbox can be tricky and there are some situations where the emails may be completely blocked. If you cannot find the messages in your Inbox or your Spam folders and you believe the messages really aren't coming through, the best bet is to switch to another address completely (preferably at a provider like Gmail, Yahoo or Hotmail).
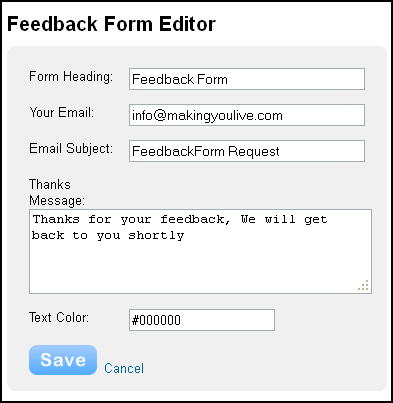
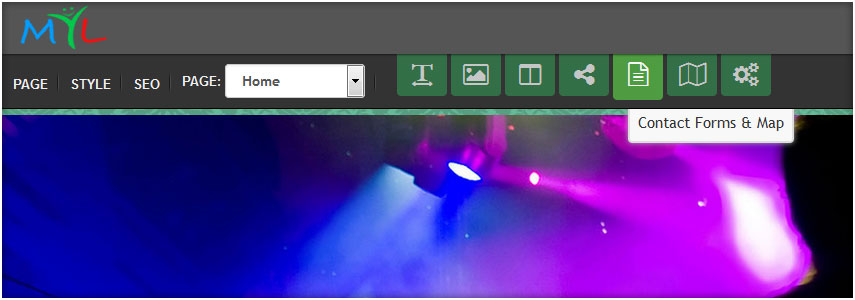
Click on the Contact Forms & Map button in the Tools.
This will bring you Feedback form editor, just change the address in your email box. Be sure to Publish the site after making the change.
Having trouble uploading a file or image? Take a look at this short troubleshooting guide to get back on track.
Note that you should use this guide only if you've received an error message regarding an image / file uploads or if the option to upload files appears to be broken in your account in some other way.
Upload Limits: Static user can upload up to 1GB, dynamic user can upload up to 3 GB, professional user can upload up to 5GB and corporate user can upload up to 10 GB. Make sure the files you're uploading do not exceed the limits of your account.
Clear Your Cache: Clearing your browser cache is often a great fix for annoying little problems that come up. You need to clear the cache, close the browser, re-open the browser and then log back in to your account.
Try a Different Browser: Our service usually works perfectly with most flavors of Firefox, Safari, Chrome and Internet Explorer. But if clearing the cache doesn't help out, switching to any other browser than the one you're currently using may be the way to go.
Check your Flash: Uploading files to Making You LIVE relies on the Flash plug-in. If none of the above helps, you should test to see if flash is properly installed on your computer.
The articles in this section make up the Beginner's Guide to Making You LIVE. If you're just getting started, we recommend taking time to go through each of these short articles. By the time you're done, you'll be ready to build a great first site.
Making You LIVE is the easiest way to build a website for you by you. But that doesn't mean you can't use some help getting to know your way around. All the basics you need in order to put together your site can be found over these next several pages and it will take few minutes to read this guide
The Web Address
Every site must also have an address (like www.xyz.com for example) so that your visitors can find it.
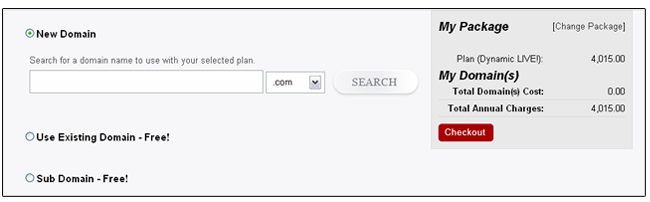
You have three options for choosing an address, and the address, like the title, can be very easily changed at any time:
New Domain - If you want your own personal domain, you can pay to register it with this option.
Use Existing Domain - Free! If you already own a domain that you've previously purchased through Making You LIVE or another provider, you can enter it here.
Sub Domain - Free!This is an address like yoursite.themyl.com. Completely free to use.
Tools
Tools are the basic building blocks of your site. All of your site content, be it text, pictures, videos or what have you, is added via tools.
Pages
Our site can have as many pages and sub-pages as you want, since there are no page limits for either free or paid accounts.
Design
You can select from any one of a number of themes and switch to a different theme at any time. This affects the look of your site. All of your pages and elements remain in place, no matter what theme you choose. We'll switch themes and take a close look at the theme options (like changing fonts) towards the end of the guide.
Elements are the basic building blocks of your site.All of your site content, be it text, pictures, videos or what have you, is added via an element.
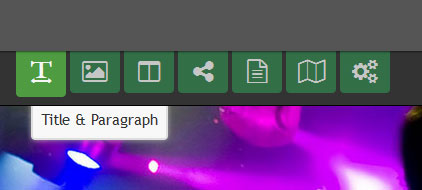
Adding an element to a site is as simple as clicking on that element and dragging it to the content area of a page. Let's drag the most basic element -- the text element -- by clicking on general tools button in Tools.
After clicking on general tools the following will displayed.You can write a word, a sentence or multiple paragraphs in a single element.Just click within the element to start editing.
As you write your text, take notice of the toolbar at the top.Every element has its own toolbar with functions specific to that element.
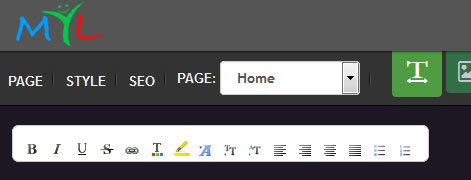
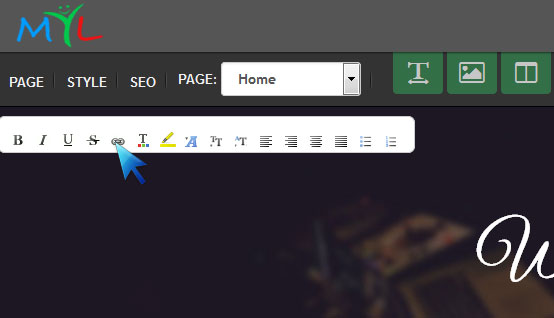
The text toolbar enables you to (from left to right) Bold, Italicize, Underline, change the color, increase the size and decrease the size of selected text. You can also create a link to another site, a page within your own site,change font type or an uploaded file.Beyond that you can align all the text in an element to the left, center or right, create both bulleted lists and numbered lists.
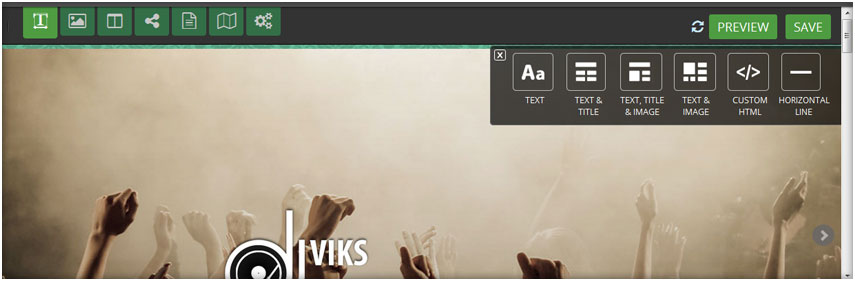
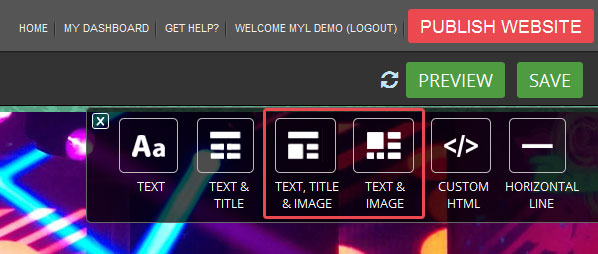
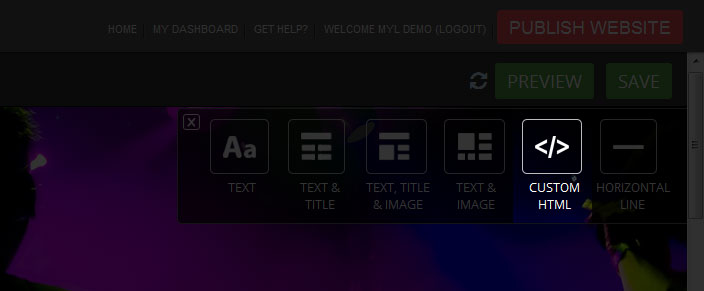
There are four elements that can be used to add images to a site:
- Paragraph With Title and Image element
- Paragraph With Image element
- Image element in multimedia tool - upload one image per element.
- Photo Gallery element in Website Settings & Widget - upload as many pictures as you like to create a photo gallery
Paragraph With Title and Image & Paragraph With Image element can be added by clicking General tools button in Tools.
Adding any image element to your site works the same way as adding a text element - just drag it to the page. You can upload an image from your computer by clicking on UPLOAD NEW PHOTO. Doing so opens a file browser on the computer through which an image can be selected.

There are a number of different ways to change and edit an uploaded image.
Replace the current image with a new one.
Re-size images by clicking and dragging the box found on the lower-right-corner of each.
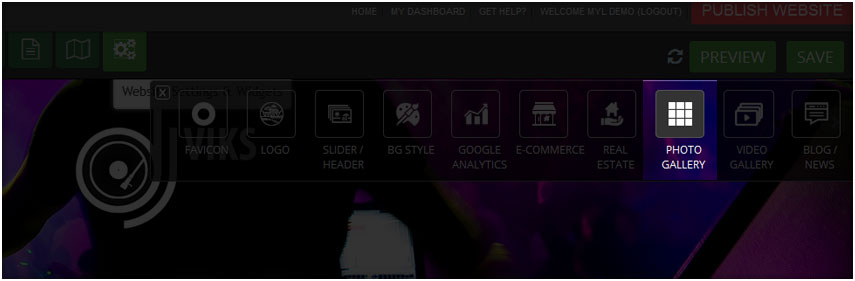
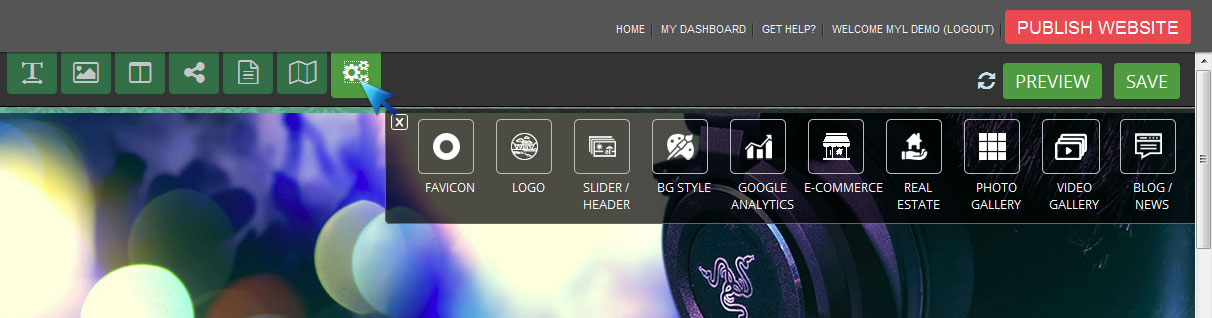
Photo Gallery element can be added by clicking Website Settings & Widget button in Tools.
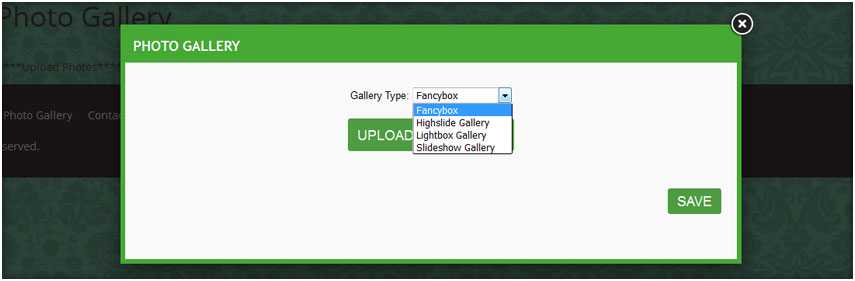
After clicking on Photo Gallery button the following will be displayed and you can choose any of the gallery type.
you can alter layout of the page by selecting Page Layouts option tab in Tools.
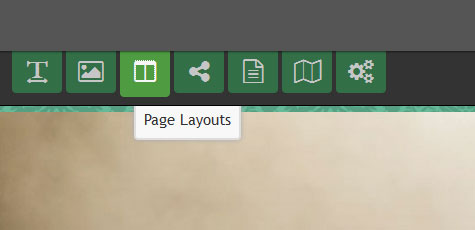
Drag any of the option(2 columns, 3 columns, 4 columns, Left column, Right column)to get started.

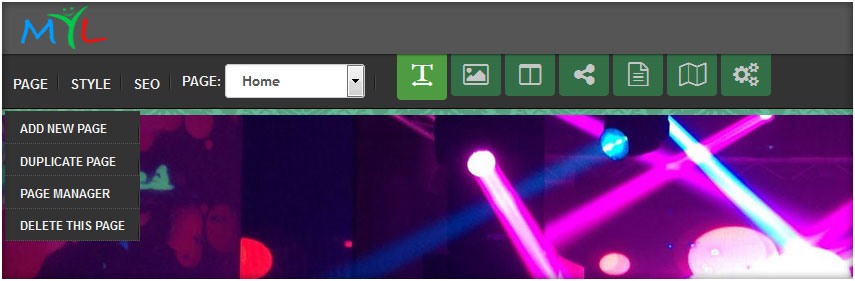
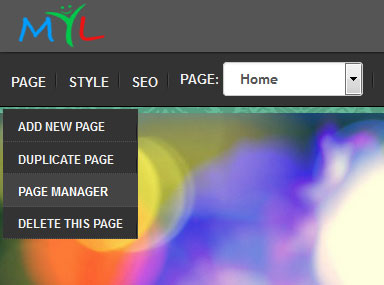
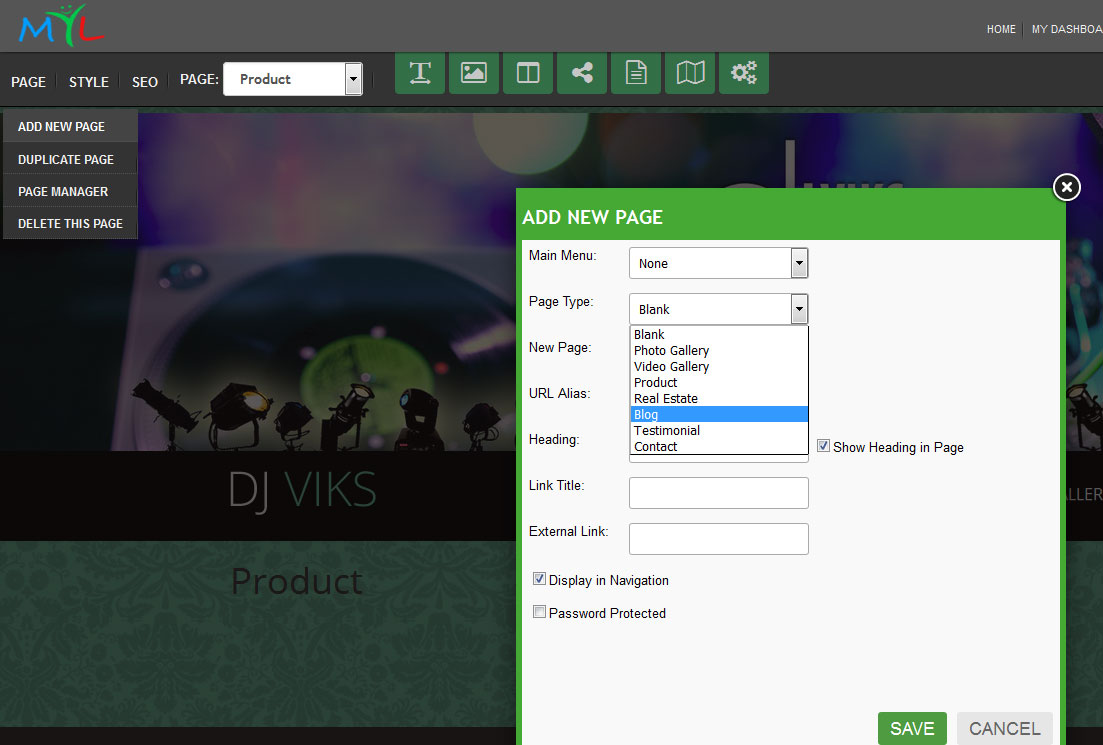
Static, Dynamic, Professional and corporate plan allows you to add unlimited pages.We place no limits whatsoever on the number of pages that can be added to a site.Creating a new page is as simple as going to the Page tab and clicking the Add New Page.
After clicking on the Add New Page following page will be displayed.

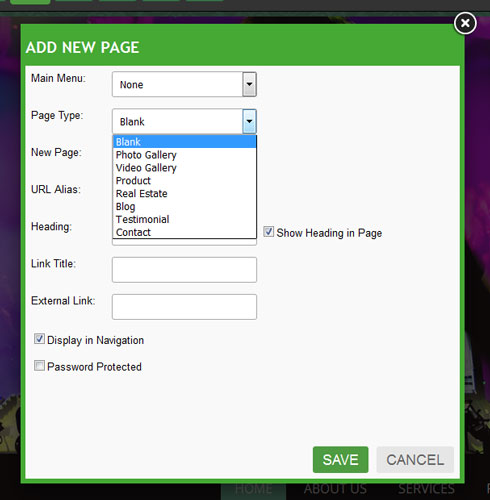
You can add a new page by typing a name whatever you want to give to your page in New Page box and heading name then click on save button to save changes.
You can create a sub-page under any of the main page by selecting one of the page in Main menu box then click on save button to save changes.
When u create a page or sub-page you can also select page type by selecting one of the type for example: photo gallery, video gallery, news etc then click on save button to save changes.
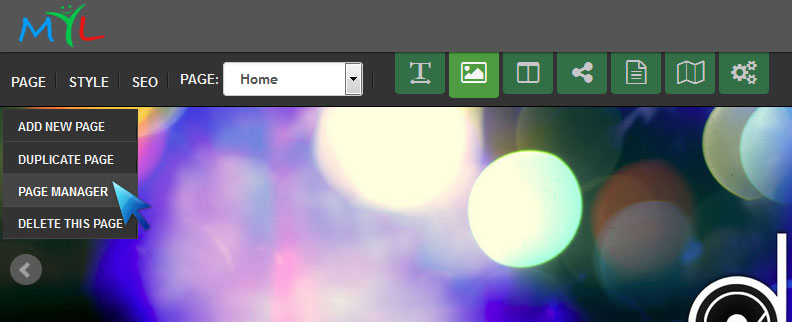
Click on Page Manager to manage the pages.
With Page Manager you can re-arrange the order of the pages by clicking and dragging them up and down the list. Dragging a page to the top of the list will make that page your Home and Home page can have whatever name you want it to have.Sub-pages appear in the site navigation menu as part of a drop-down menu for whatever page they're connected to.

Now that our site is coming along, this seems like a good time to decide which theme to use for the design. A theme can be selected at any time (whether at the beginning, middle or end of the process of creating the site) and selecting a new theme does not delete or alter the content of your site.
To change your theme, go to the Style tab and select change design.
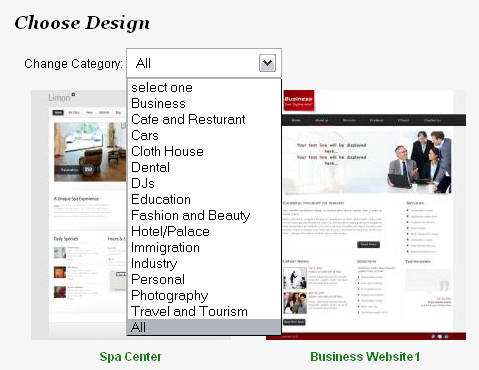
If you go to the All Themes section of the the Design tab, you'll see all the themes. These can be viewed as one big group or by looking through different categories like Business or Wedding. Don't feel constrained by the categories - any theme can be used by any person or business to create a nice looking site.
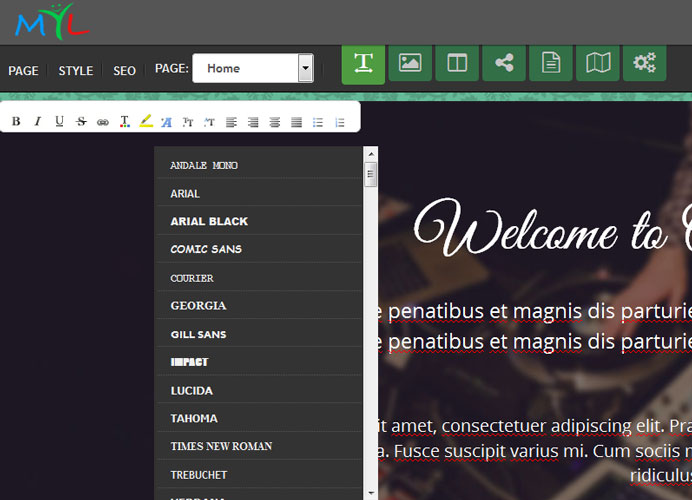
Select text to change the font type,we have different fonts to choose from.
A lot of our themes include an area for a header image (you'll know your theme includes this if there's a default image at the top of theme). As it's doubtful you'll want to use the default image on any of your pages, we've built an easy to use header creation tool so you can make your own header.
Note that if your theme does not have a default header image, you won't be able to use this feature unless you select another theme.
To get started, scroll over the header image and click the Edit button.
The following page will be displayed in which u can upload a header image of your choice by clicking the UPLOAD NEW PHOTO button.
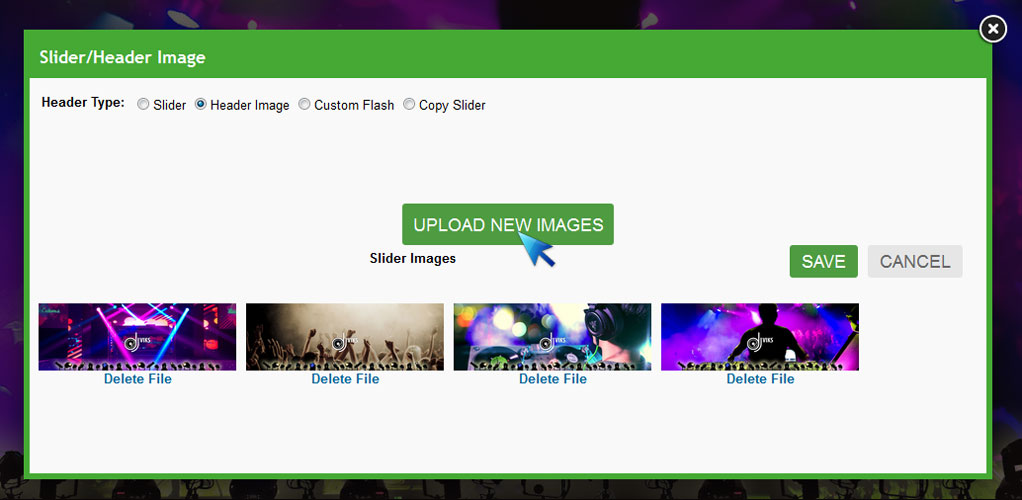
Slide Image Size should be 960x350 and Header Image Size Should be 960x2.There are four options to edit header type - Slider,Header Image, Custom Flash and Copy Slider.In slider option you can upload no. of images for making the header as slider, by selecting Header image you can change the default header image of your theme.In custom flash you can upload a flash and by selecting copy slider you can copy a slider from any page of your website like Home, About us, Services etc.
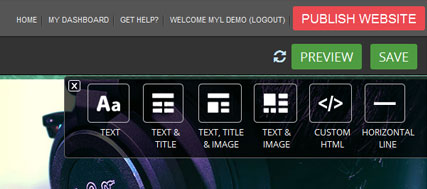
Now that you've added some basic content to your site, this is a good time Publish it. To do so, just use the Publish button in the upper right corner.
This will bring up a verification box, letting you know your site has been Published.
You can click the Published address to view your site (you can also give this address out so that other people can use it to visit your site), use the Facebook and Twitter buttons to link your friends and followers at either provider to your site, and click the "x" in the corner of the box to close the box and continue editing your site. Of course, you are probably not done with your site at this point, and that's OK. You can continue to add content through the editor whenever you like and then click the Publish button to push that content to your live site.
Text and images are likely to make up the majority of your site content. Read below to learn how to get the most from each.
Adding text to your site is as easy as dragging any of our text elements to a page. The primary text elements are Text, Paragraph with Title (a paragraph element with a Title area at the top) and Paragraph with image (a paragraph element that includes the option to upload an image alongside the text),Paragraph with title and image(a paragraph element that includes title and image both),HTML, Horizontal line.
Click on the General tools button to explore the text elements.
The following text elements will be displayed after clicking the General tools button.
Select text in the content page to make changes in the text.
You can strike the text you want to change and Bold, Italicize or Underline it. You can also change the color of the text or make it bigger or smaller.You can use the chain link icon to turn any highlighted text into a link, or to align the entire text of the element to the left, center, right or to have it fully align with each side (left-alignment is the default and is standard for most text).You can use the list options to create ordered and unordered lists and you can also undo and redo changes made in the element.
Each Making You LIVE theme has default fonts for the Site Text,Paragraph with title and Links. You can change these fonts using the General tools option in tools.
Each section (Text, Paragraph with title, Paragraph with title and image & Paragraph with image) has its own font options. Let's take a look at each.
To Change Text Fonts select a text in the page content.

Select a new Font Face from the drop-down menu.
Change the Font Color by clicking the color box. You can select another color here or even enter a specific HTML color code
Select a new Font Size.
You can use the list options to create ordered and unordered lists
You can also undo and redo changes
To upload a single image, use our image element.This element can be found by clicking Multimedia tool tab in Tools .Drag it to a page to get started
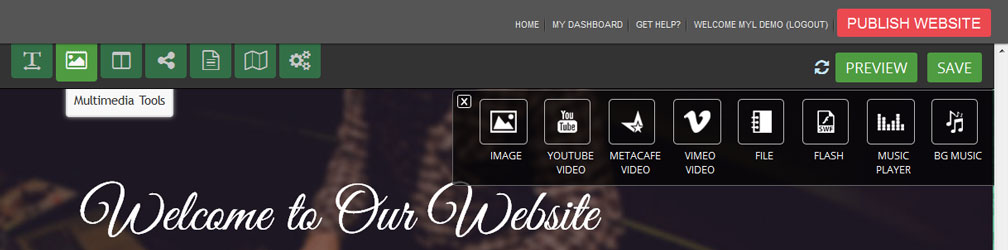
This will open the following page that presents you with three different image options. From here you can select the image you want to upload.
Images post to the page in varying sizes (usually they post at the full width of the content area of the site), but you can make any image larger or smaller using the re-size box in the lower-right corner of the image. Re-sizing an image will not impact its quality. And note that you cannot make an image larger than the content area of the site itself.
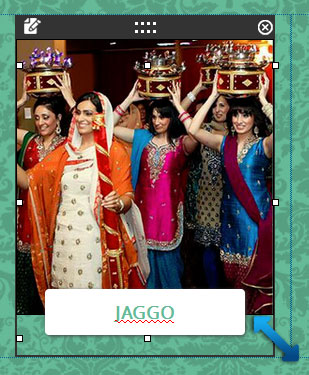
You can click an uploaded image to make further changes to it.You can delete the uploaded image directly by selecting the red cross or can cahnge image by selecting edit.
Our slideshow option (available under the "Website settings & Widget" Tool) enables you to show off your photos with style.
To add a slidehow,click on Photo Gallery.
The following page will be displayed, now select slideshow gallery to add photos.
Upload photos from your computer to create a slideshow gallery.You can delete an selected image by clicking on the thumbnail of the image.
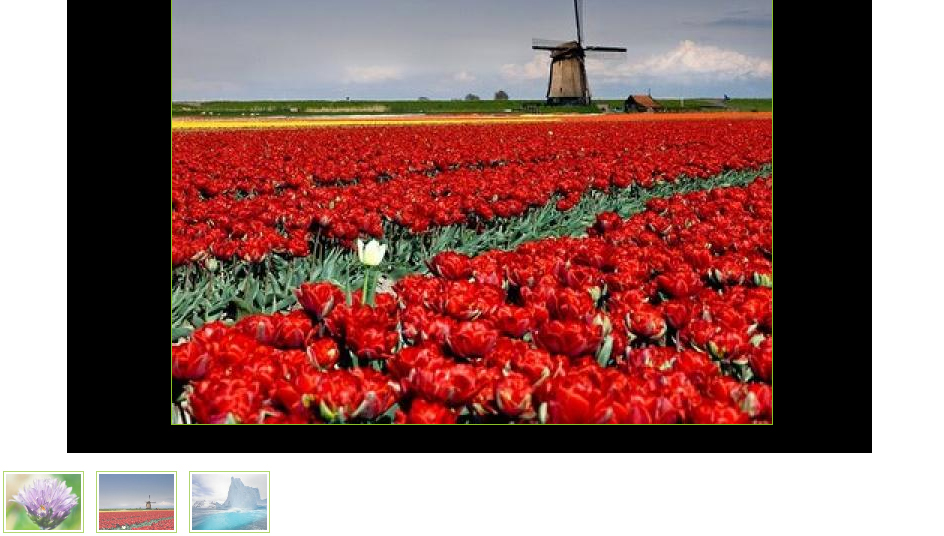
Give the photos a few minutes to upload and then you'll see your gallery on the page
Having trouble uploading a file or image? Take a look at this short troubleshooting guide to get back on track.
Note that you should use this guide only if you've received an error message regarding an image / file uploads or if the option to upload files appears to be broken in your account in some other way.
Upload Limits: static user can upload up to 1GB, dynamic user can upload up to 3 GB, professional user can upload up to 5GB and corporate user can upload up to 10 GB. Make sure the files you're uploading do not exceed the limits of your account.
Clear Your Cache: Clearing your browser cache is often a great fix for annoying little problems that come up. You need to clear the cache, close the browser, re-open the browser and then log back in to your account.
Try a Different Browser: Our service usually works perfectly with most flavors of Firefox, Safari, Chrome and Internet Explorer. But if clearing the cache doesn't help out, switching to any other browser than the one you're currently using may be the way to go.
Check your Flash: Uploading files to Making You LIVE relies on the Flash plug-in. If none of the above helps, you should test to see if flash is properly installed on your computer.
Links allow you to use text or images to link a site visitor to another page or file either on your site or on another site.
Text Links
To create a text link, first highlight the text you want to use for the link
Then click the "chain link" icon in the text toolbar.
This will open the link dialog box, where you can select the kind of link you'd like to create
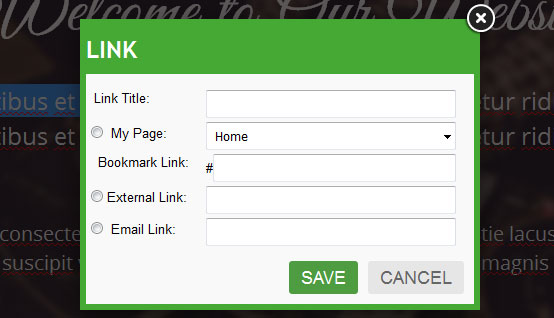
Link to an email address.This makes will cause the visitor's mail program to open so they can write you directly. Note that if the visitor is not using one of these programs, the link won't work and they'll just need to copy your address or use a Contact Form if you have one on the site.
Picture Links
To create a picture link, first click the image you want to use for the link.

Then click the Link option in text toolbar
This will open the link dialog box, where you can select the kind of link you'd like to create. You can: Link to another page on your own site. Just select the page you want from the drop-down menu.
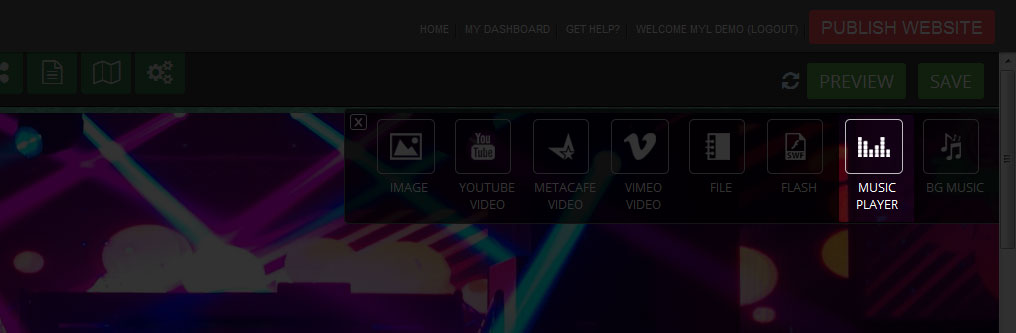
Use the articles below to learn how to add video, audio, calendars and other content to your site.
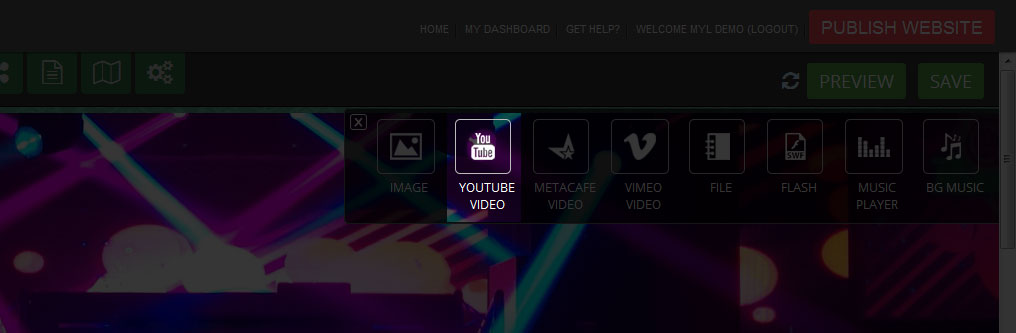
You can directly upload video to your site, there are no. of options available under Multimedia Tools to upload video of your choice. Click on Mutimedia tools tab in tools to upload a video.
To get started drag any of the video option(Youtube video, Metacafe video, Vimeo video, Flash video) to the content page of your site.
You can browse Flash video from your computer.
While watching a great website, you can listen to the favourite soothing music without ever getting bored. Our audio player allows you to easily add music or other audio files directly to your website.This element is part of our Dynamic, Professional and Corporate Live.
The Audio Player element is available under the "Multimedia tools" in Tools.Drag it to a page to get started.
click Upload new File to select an Audio file to upload. Keep in mind that our audio player currently only accepts audio files that are specifically in MP3 format.
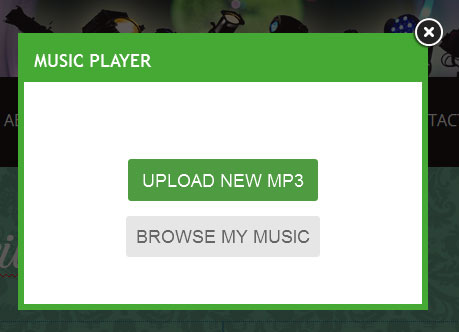
The audio file may take a few minutes to upload.Once the upload is complete,you should now be able to play the file without any problems.
Our YouTube Video element allows you to share videos from YouTube.This element can be found within Multimedia tools in tools.Drag this element to a page to get started.
You need to enter the direct link to the YouTube video in the provided field.
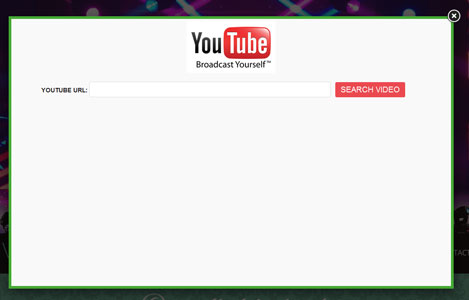
Once you add the link, the video should show up on your page in less that a minute. If it does not show up then you are not using the direct link - please double check that you are copying the proper link using the option noted above.
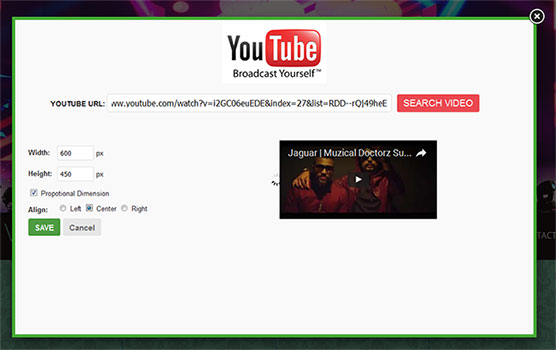
You can align the video left, right or center and can also change the video.
A website can have an unlimited number of pages and almost everything you need to know about those pages can be found here.
Static, Dynamic, Professional and corporate plan allows you to add unlimited pages.We place no limits whatsoever on the number of pages that can be added to a site.Creating a new page is as simple as going to the Page tab and clicking the Add New Page.
After clicking on the Add New Page following page will be displayed.
You can add a new page by typing a name whatever you want to give to your page in New Page box and heading name then click on save button to save changes.
Change the Page's Name.
Hide the page in the navigation menu.
Turn on Password Protection.
Sub-Pages are just like normal pages, except they appear in a drop-down menu beneath another page in the site's navigation menu. The drop-down menu appears when you scroll your mouse over the main page.
Sub-pages are created just like normal pages - using the New Page button found under the Pages tab. It just takes a little dragging and dropping to turn a regular page into a sub-page. Select the page you want to turn into a sub-page Picture.
You can make several pages into a sub-page of another page by repeating these steps and you can even make sub-pages of other sub-pages.
Pages are displayed as part of your site's navigation menu by default.However, you can get around this by marking a page as "hidden." Hidden pages donot show up as part of your site's navigation.
For getting started go to Page option and select Page Manager.
There is a hidden icon on your list of pages, click on the hidden icon to hide the page from navigation menu.
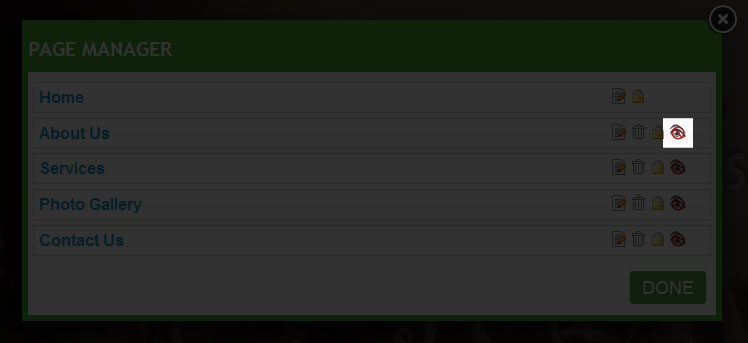
Page will no longer show up in the site's navigation menu, though you can still manually link to it yourself from elsewhere on your site.
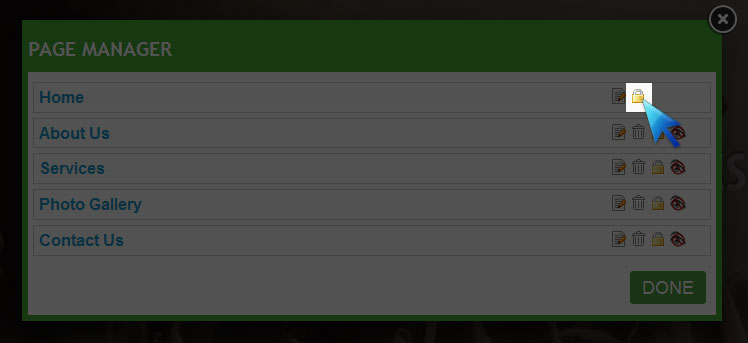
Setting a Site Password automatically password protects every page of your site. If you only want to password protect specific pages, you'll now need to make adjustments under the Pages tab.
If someone tries to access that page, they'll be prompted to enter your password. Note that the password must be entered exactly as written in your site's Settings section, including any capitalization.
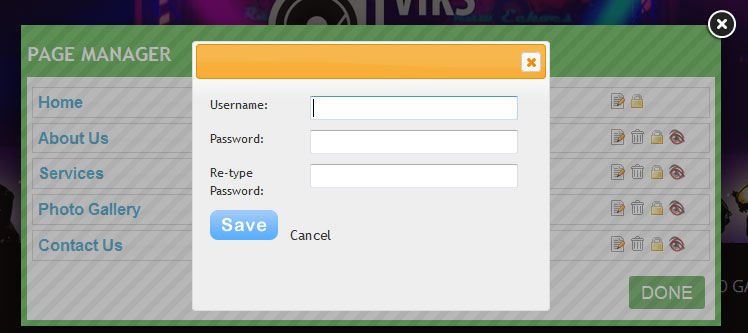
Each site can only have one password, no matter how many pages are protected. And once a visitor enters the password for one page, they'll be able to access any other password protected pages until their session is over (when they close their browser) - after that point they'll need to enter the password again the next time they visit a password protected page on your site.
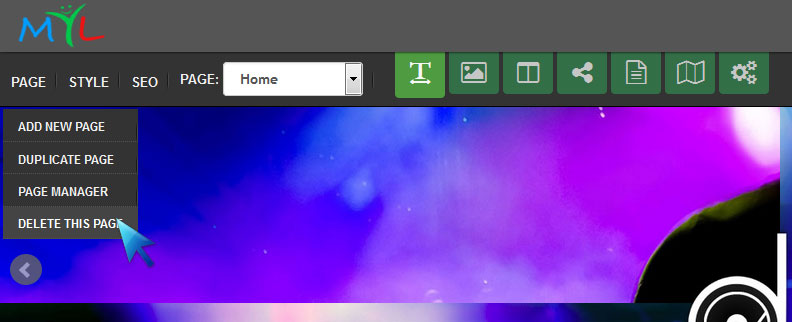
To delete a page click on Page and select Delete this Page option.
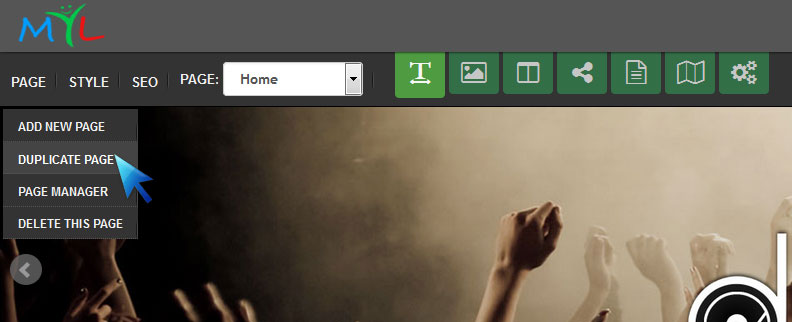
 Duplicate a Page

As you add pages to your site, they appear in the site's navigation menu and are also stacked in a list found under your Pages tab.

To move a page elsewhere in the list, just click it and drag it wherever you want.Moving the "About us" page
The list of pages can be seen in Page Manager option in Page.
All of our themes have a place for your site's title and most of them have a default area for a header image that displays across the top of your website.
Every site has a logo, you can change the default logo anytime by clicking on Style and selecting Change Logo.
You can also change logo by clicking on Website Settings & Widget tab in Tools and selecting logo option.
Every Making You LIVE template has a logo, you can change the default logo anytime by clicking on Style and selecting Change Logo. You can also change logo by clicking on Website Settings & Widget tab in Tools and selecting logo option. With Making You LIVE templates you can use three types of logo i.e. Image, Flash or Text logo.
1. Image logo - You can upload an image from your computer by clicking on Upload New Logo or Browse My photos. The image must be a JPEG (JPG), GIF or PNG. If you don't know the difference, don't worry: most images are JPGs so this is not something you'll likely have to give much thought.
2. Flash logo - This option gives u flash or blinking logo which can make your site looks more better. You can upload an image from your computer by clicking on Upload New Logo or Browse My photos. This option only allows .swf images to upload.
3. Text logo - Write logo in your own words. You can change its style, size, color and formatting . Keep in mind that every theme has a set amount space available for a logo image. And the logo will be automatically resized to fit in this area. Aside from altering the CSS to provide more space (which you should only do if you're experienced with HTML), there is no way to change the amount of space an individual theme provides for a logo image.
Keep in mind that every theme has a set amount space available for a logo image. And the logo will be automatically resized to fit in this area. Aside from altering the CSS to provide more space (which you should only do if you're experienced with HTML), there is no way to change the amount of space an individual theme provides for a logo image.
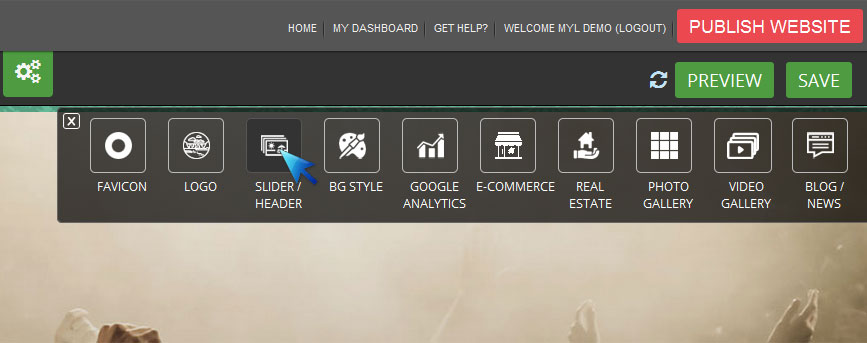
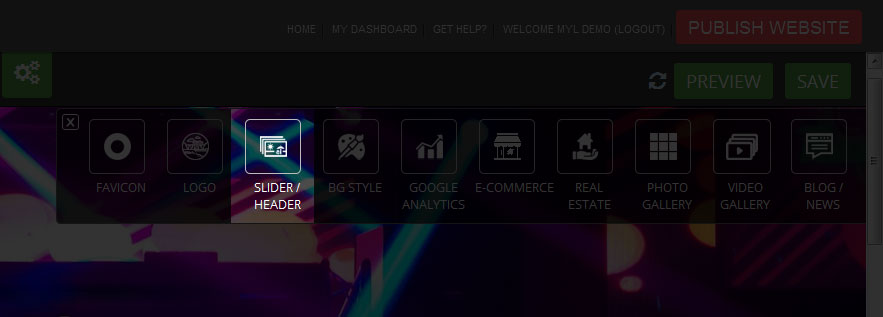
A lot of our themes include an area for a header image with a default image. As it's doubtful you'll want to use the default image on any of your pages, we've built an easy to use header creation tool called Header/Slider in Website Settings & widget so you can make your own header.To get started click on Website Settings & Widget.
The following options will be displayed, select Header/Slider to continue.
You can make several pages into a sub-page of another page by repeating these steps and you can even make sub-pages of other sub-pages.
When you're happy with an image, select the Save button to Save it.If you want to delete the default image directly, Click the image and then click the red X in the corner to do so.
You don't have to use the same header image on every page of the site. You can use one header for the Home, another header for your Contact page and another for several other pages.For adding header image click on the website settings & widget option in Tools.
Click on Header/Slider to upload a header image from your computer.
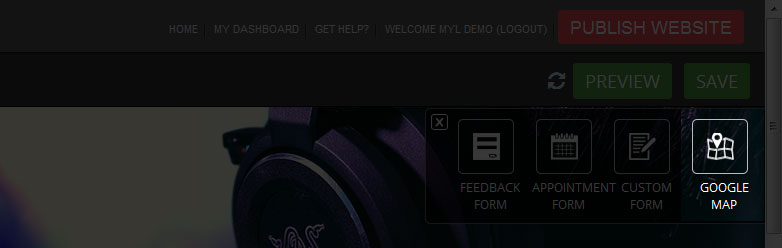
If your business or organization has offices that site visitors can visit, it's helpful to include a map to that location to your site. And we have a built-in Google Maps element that helps you do just that.Select Contact Forms & Map tab in Tools for google maps.
Click on Google Maps and drap it to the page to get started.
The following page will be displayed
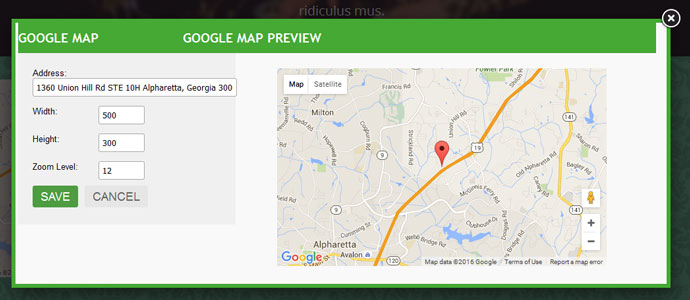
Change the size of the map using Width and Height.
Set the initial Zoom level.
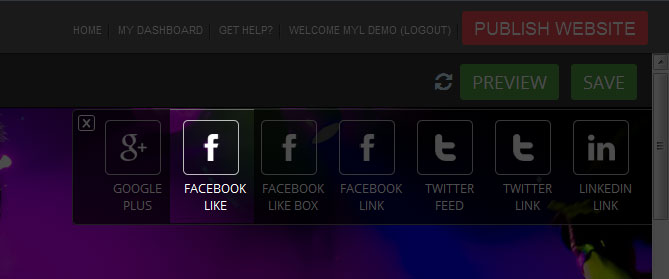
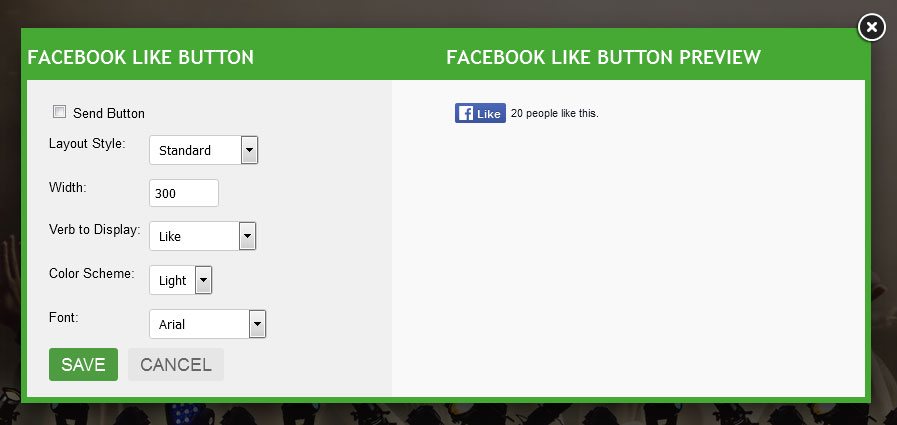
Adding a Facebook Like button to your site is a great way to let visitors share your site with their friends. Go to Social Networking & Tools in Tools and select "Facebook Like" to get started.
Click on HTML to get started.
Our Tools provides an enormous amount of options for designing and editing a website,But there still may be some situations where you want to make a tweak to the HTML or CSS of the site. To edit HTML of a theme go to General tool tab in Tools.
Click on HTML to get started.
Learn about the basics of HTML / CSS from the www.w3schools.com excellent (and free) website.
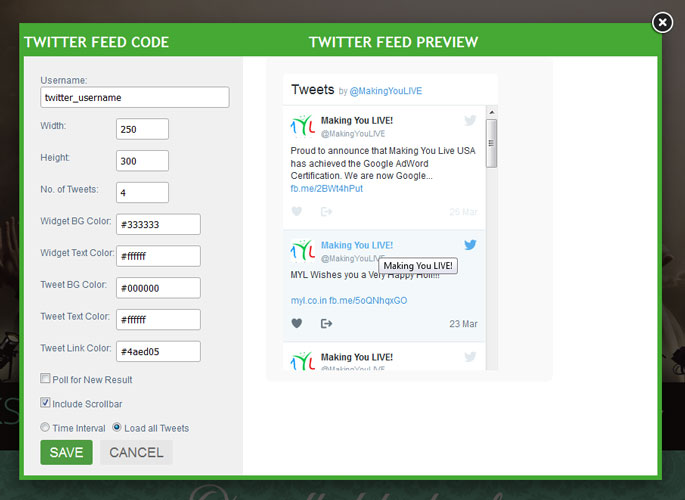
Twitter provides an easy to use widget generator so you can share all your recent tweets with visitors to your site. Here's how to use it, to get started click on Social Networking Tool in Tools and select Twitter Feed.
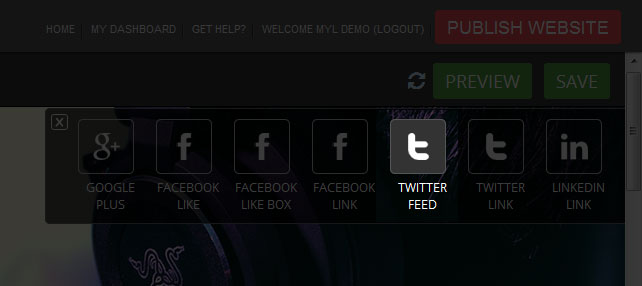
Drag Twitter Feed to the page to get started.
Forms are an easy way for your site visitors to send information to you. Learn how to use them by reading the articles below.
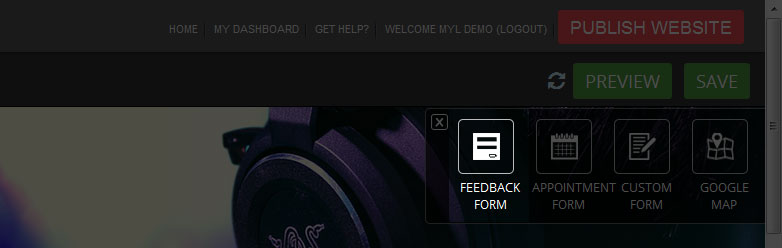
To create a Feedback form select Custom Forms & map tab in Tools
A Feedback form provides visitors to your site an easy way to reach out to you.
To get started click on Feedback Form and drag it to the content page
The following page will be displayed when you drag Feedback Form, fill the form and click save tab to save the form.
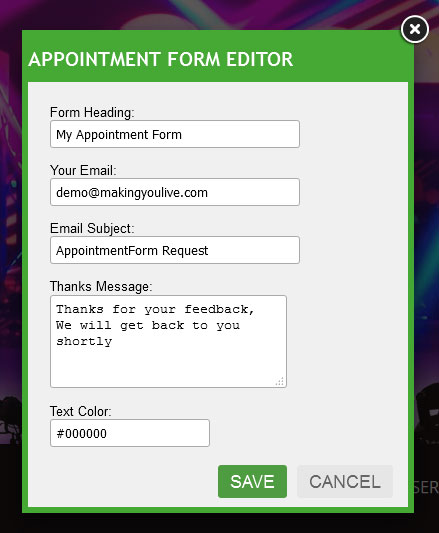
To create a Appointment form select Custom Forms & map tab in Tools
To get started click on Appointment Form and drag it to the content page
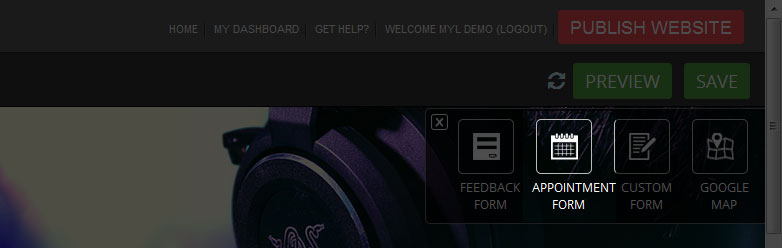
The following page will be displayed when you drag Appointment Form
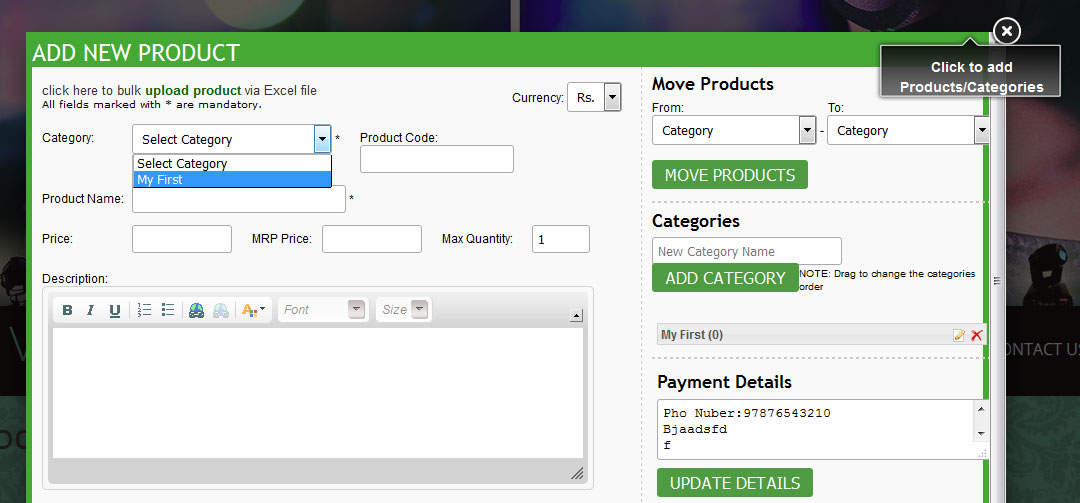
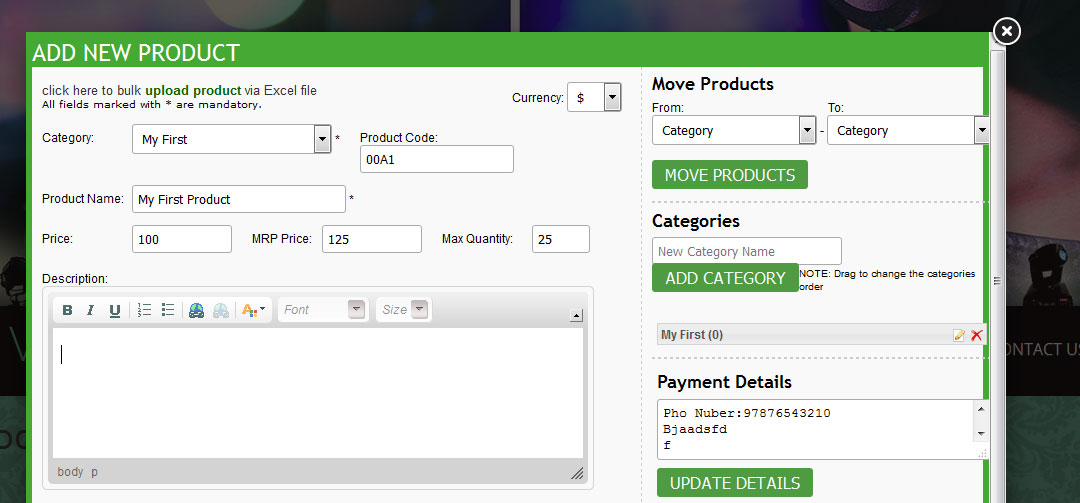
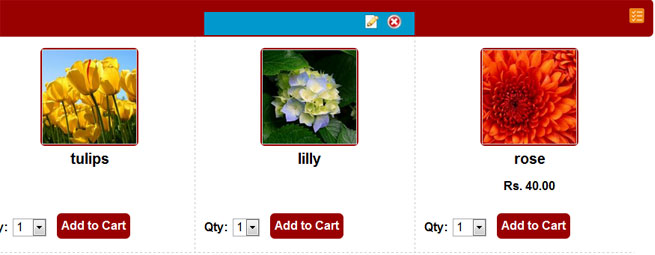
Open product page and click on Product tool from Website Settings & Widget toolbar. It will open a following product module.
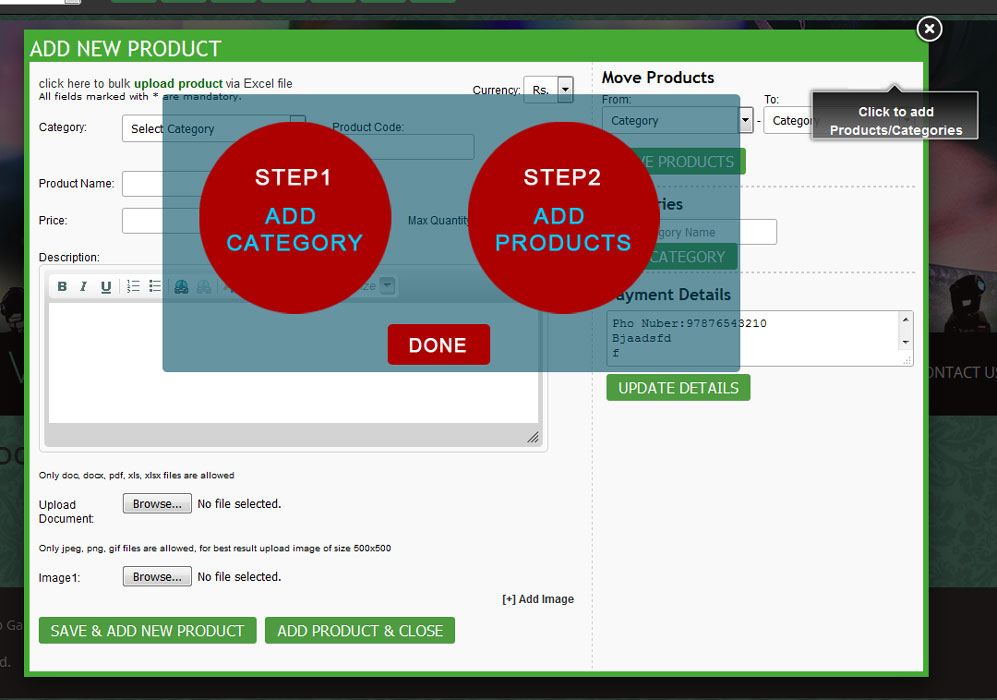
First add product category and then add products and their description with upto 6 images. To add products to the categories first you have to choose the added category from category list, enter product name and fill other columns such as maximum quantity, product code, price and description as required. Choose file or image to be attached for a product. If you don't want to attach any image for a product, don't worry you can continue without adding image.
Click on Save & Add New Product if you want to continue with adding more products otherwise click on Add Product & Close button. Your product will be successfully added to your Product page.
We can easily edit any category name from product module by simply clicking on edit Icon in front of category name as shown above.

We can easily edit any category name from product module by simply clicking on edit Icon in front of category name as shown above.

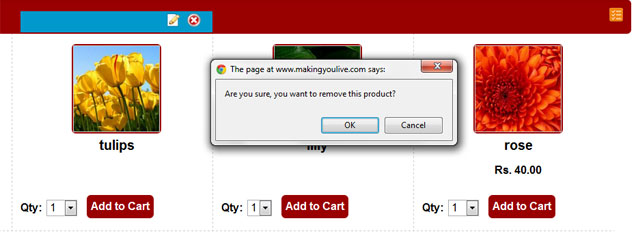
You can also delete any category from list in product module by simply clicking on delete.
Icon in front of category name as shown above. You will be asked to move all products in category to another category before deletion. Click Cancel if you first want to move products to another category or click OK if you want to delete all products within category.
We can easily edit any category name from product module by simply clicking on edit Icon in front of category name as shown above.
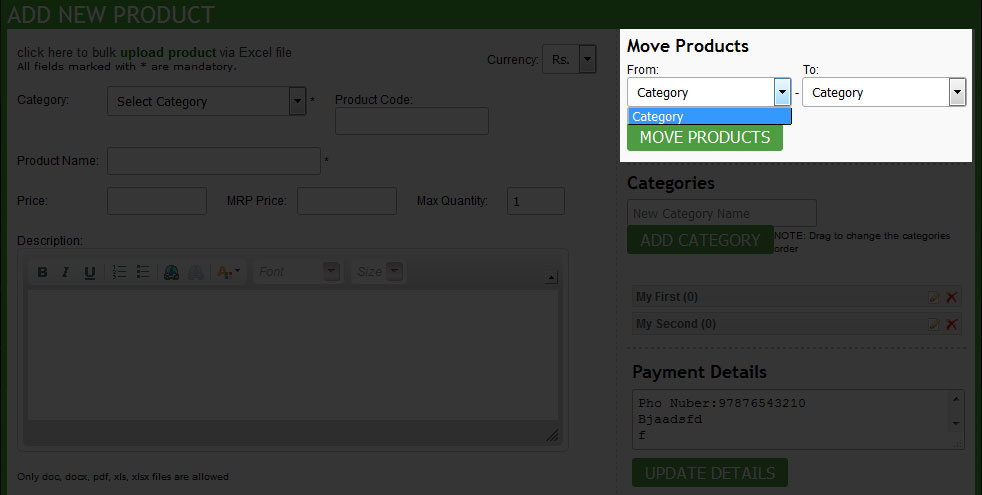
You can move products from one category to another from product module by simply using From and To columns as shown above and selecting category name whose products you want to move to another category.
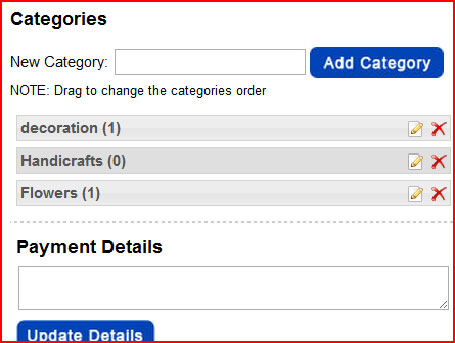
You can sort or change categories order by simply dragging and dropping the categories from product module.

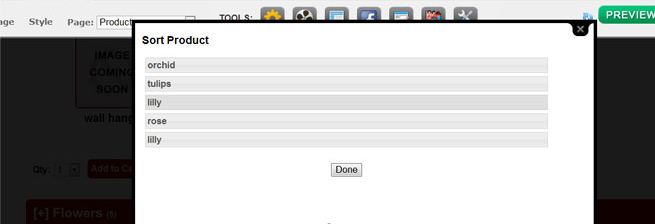
To change the order of products click on ![]() icon in category name bar in product page. It will open the following window. Sort the products by drag and drop method and click on Done button to save the changes.
icon in category name bar in product page. It will open the following window. Sort the products by drag and drop method and click on Done button to save the changes.
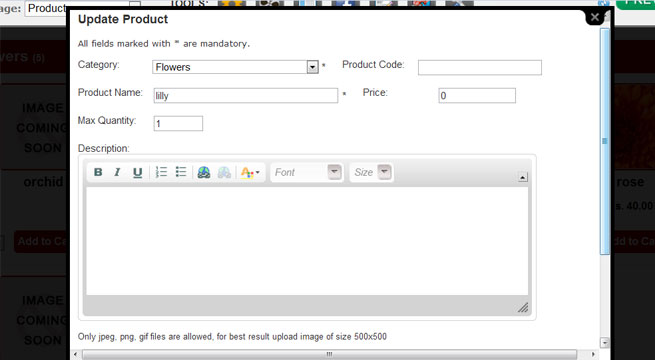
To update or edit the product in product page click on edit icon from the image bar. It will open update product window as shown below. You can update your product as required and click on Update Product button to save the changes.
You can easily remove or delete any product from category by clicking on ![]() icon in image bar.
icon in image bar.
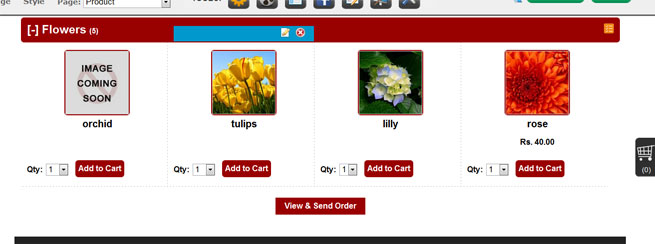
To add products to cart click on Add to cart button below image. It will open My cart window as shown below. Here you can change the quantity of product and click on Update Cart button to save the changes. You can also delete a product from list by clicking on ![]() icon.
icon.

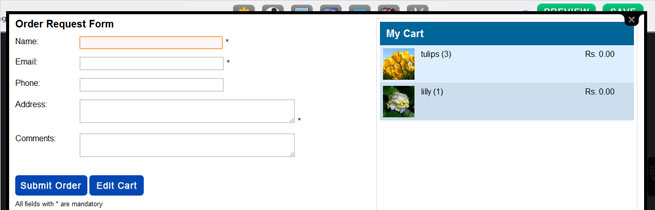
To send order click on Checkout button. It will open following Order Request Form. Fill the form and click on Submit Order button. Click on Edit Cart button if you want to make changes in cart list.
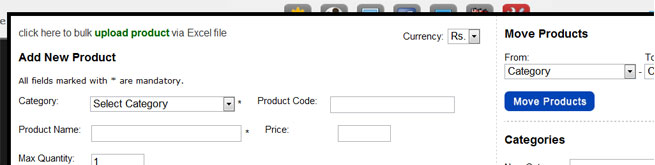
You can also bulk upload product by using MS -Excel. For bulk upload click on upload product via Excel file at the top of product module. It will open following page. Upload Excel file having products and its description. To go back to Product module Click on Single upload via product form.

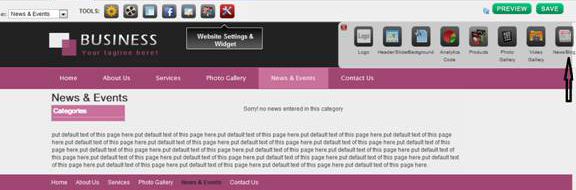
To add News page, first click on Add New Page from Page drop down menu. Select page type as News and fill New page name and its heading as required .Click on save button .It will open News and Events page according to your template.
From Website Settings & Widget toolbar select News/Blog tool as shown above. It will open the Add New News pop up as shown following. First add category name and click on add category button.
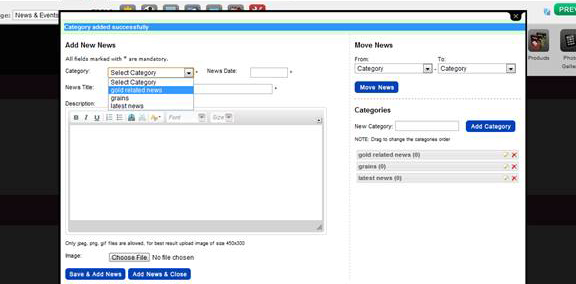
Select category and fill other columns such as News title, News date and description. Add image if you want and click on Save and Add News, If you want to continue with adding more news otherwise click on Add News & Close button. News will be successfully added to your page.

We can easily edit any category name from product module by simply clicking on edit Icon in front of category name as shown above.
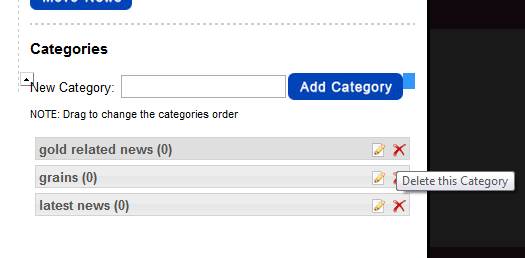
You can also delete any category from list in News module by simply clicking on delete icon in front of category name as shown above. You will be asked to move all News listed in category to another category before deletion. Click Cancel if you first want to move contents to another category or click OK if you want to delete all contents within category.
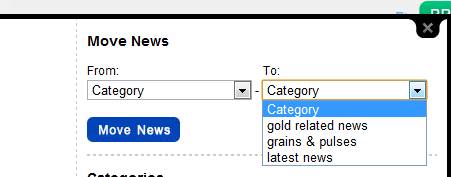
You can move news from one category to another from "Add New News" window by simply using From and To drop down lists as shown above and selecting category name whose news or contents you want to move to another category.
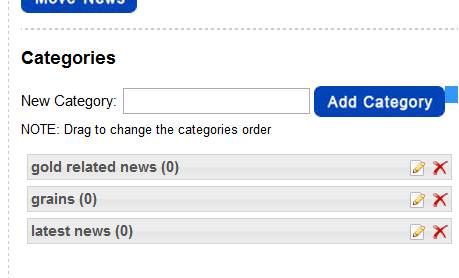
You can sort or change categories order by simply dragging and dropping the categories from News module.
To change the order of news click on icon in category name bar in News page.It will open the following window. Sort the news listed by drag and drop method and click on Done button to save the changes.

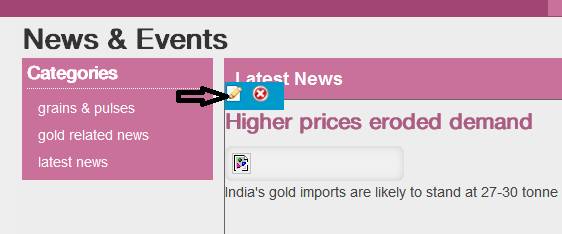
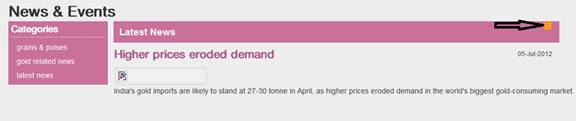
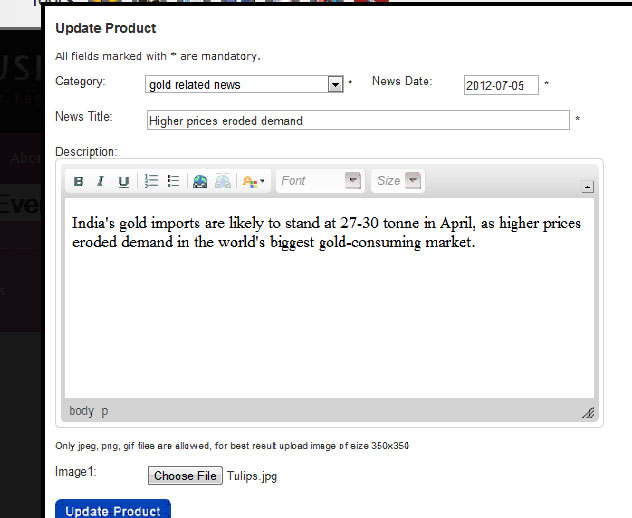
To update or edit news in product page click on edit icon from the bar. It will open update news window as shown below. You can update your news as required and click on Update news button to save the changes
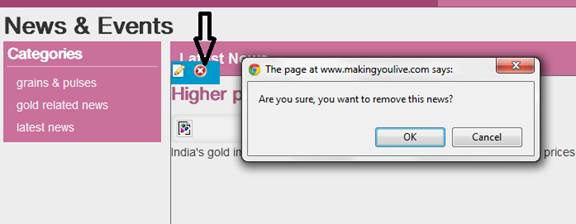
You can easily remove or delete any news by clicking on icon in bar.